The Ultimate Guide to Push to Connect Fittings
Introduction
Push to connect fittings, often referred to as quick-connect or push-fit fittings, mark a significant advancement in the realm of connection technologies for pipes and tubing. These innovative fittings have quickly risen to prominence, becoming a cornerstone in fields as diverse as modern plumbing, advanced manufacturing, and an array of DIY projects.
Understanding Push to Connect Fittings
Definition and How They Work
Push to connect fittings, a cornerstone in the evolution of connection technology, are ingeniously designed to facilitate the rapid and effortless connection of fluid or air lines. Characterized by their simplicity, these fittings offer a robust solution for joining tubing or pipes without resorting to conventional methods like clamping, gluing, or soldering. The essence of their functionality lies in a straightforward push-in action, which secures the tubing into place, creating a reliable seal that is both leak-proof and durable.
The Mechanics Behind the Connection
The operational principle of push to connect fittings is grounded in their unique construction. Each fitting is composed of several key components:
Body: The main structure of the fitting, typically made from materials like plastic, brass, or stainless steel, designed to accommodate specific types of tubing.
O-Ring Seal: A crucial element that provides the initial seal between the fitting and the tubing, ensuring no fluid or air escapes. The O-ring is made from materials compatible with a wide range of fluids and gases to prevent degradation.
Gripping Mechanism: This part, often a collet with stainless steel teeth, grips the tubing firmly in place once inserted, preventing it from being pulled out under pressure.
Release Mechanism: A feature that allows the tubing to be easily released from the fitting with a simple push on the release collar, facilitating easy removal or repositioning of the tubing.
Advantages Over Traditional Fitting Types
Push to connect fittings offer several distinct advantages that set them apart from traditional connection methods:
Speed of Installation: Their design allows for connections to be made in seconds, significantly reducing assembly time and effort.
Tool-Free Connection: No special tools or skills are required for installation, making them accessible to professionals and amateurs alike.
Flexibility: They can be easily disconnected and reused, offering flexibility in applications where system configurations may need to be changed or updated.
Versatility: Suitable for a wide range of applications, including water, pneumatic systems, and even in critical systems like medical devices and automotive braking systems.
Leak-Proof and Secure: The combination of the O-ring seal and the gripping mechanism ensures a secure, leak-proof connection that can withstand substantial pressures and temperatures.
Types of Push to Connect Fittings
Push to connect fittings come in an array of materials, shapes, and designs, each optimized for specific uses and conditions. Understanding these variations is crucial for selecting the right fitting for any given application, ensuring optimal performance and reliability.
From Material
Plastic Fittings
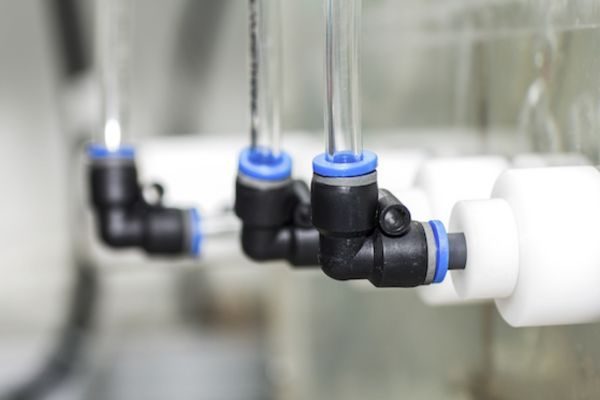
Characteristics: Plastic fittings are prized for their lightweight nature and exceptional resistance to corrosion. They are typically made from materials like POM (Polyoxymethylene) or nylon.
Applications: Ideal for low-pressure applications such as water filtration systems, aquarium setups, and in certain pneumatic systems where chemical compatibility and corrosion resistance are key considerations.
Brass Fittings
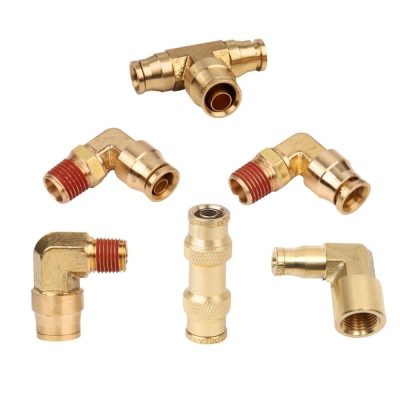
Offer a good balance between strength, corrosion resistance, and cost-effectiveness. They are commonly used in water systems, pneumatic applications, and for general industrial use.
Stainless Steel Fittings
Known for their superior strength and excellent resistance to corrosion and high temperatures, making them suitable for demanding applications in harsh environments, including food processing, marine applications, and medical devices.
From Appearance
Straight Connectors
Function: Serve to connect two pieces of tubing or pipes in a straight line.
Use Cases: Widely used in both simple and complex piping systems to extend the reach or to repair sections of tubing.
Elbow Connectors
Function: Change the direction of tubing at various angles, most commonly at 90 degrees, but also available in other angles for flexible system design.
Use Cases: Essential in navigating obstacles within a system layout, allowing tubing to be directed around corners or other components.
Tee Connectors
Function: Either split a single flow into two directions or combine two flows into one, making them versatile components in branching systems.
Use Cases: Useful in distribution systems, such as in irrigation, pneumatic supply lines, or in complex machinery requiring multiple fluid or air sources.
Applications of Push to Connect Fittings
Water Filtration Systems
Overview: Push-to-connect fittings are extensively used in water filtration systems for both residential and commercial settings. They facilitate easy installation and maintenance of filtration units, allowing for quick changes and upgrades without extensive downtime.
Benefits: The corrosion-resistant properties of certain push to connect fittings, particularly those made from plastic or stainless steel, ensure longevity and reliability in water-intensive environments.
Pneumatic Control Systems
Overview: In pneumatic control systems, which rely on compressed air to operate machinery and equipment, push-to-connect fittings are vital for securing tubing that transports air between components.
Benefits: The quick-connect mechanism is particularly beneficial in pneumatic applications, where frequent reconfiguration of systems can be necessary to optimize performance or accommodate new machinery.
Automotive Fuel and Brake Lines
Overview: The automotive industry utilizes push to connect fittings in the design of fuel and brake line systems, where a secure and robust connection is critical for safety and performance.
Benefits: These fittings are designed to withstand the high-pressure conditions and corrosive environments typical of automotive applications, offering reliability under rigorous use.
Medical Devices and Laboratory Equipment
Overview: In the medical and laboratory sectors, push to connect fittings are used in devices and equipment that require precise control of fluids or gases. These fittings must meet stringent standards for cleanliness, non-toxicity, and, in some cases, biocompatibility.
Benefits: They provide a quick and secure method for changing or maintaining components in sensitive environments, minimizing the risk of contamination and facilitating easy sterilization.
Additional Applications
Beyond these key areas, push to connect fittings are also employed in:
Irrigation Systems: Efficiently managing water distribution in agricultural and landscaping applications.
Manufacturing Lines: Connecting machinery and equipment in production lines, where downtime for maintenance or reconfiguration needs to be minimized.
Residential Plumbing: Simplifying installation and repair tasks for homeowners and professionals alike, making plumbing more accessible to a broader audience.
Choosing the Right Fitting for Your Needs
When integrating push to connect fittings into your system, a clear understanding of your requirements and the operational conditions is essential. Here are the key factors to consider:
Material
The choice of material for your fittings plays a crucial role in their performance and compatibility with the rest of your system.
Plastic Fittings: Best suited for applications requiring corrosion resistance and lightweight components. Ideal for water systems and certain pneumatic applications where aggressive chemicals are not present.
Metal Fittings: Brass and stainless steel fittings are recommended for higher pressure and temperature applications. Stainless steel is particularly suited for environments where corrosion resistance is critical, such as in marine or chemical processing applications.
Pressure Rating and Temperature
The operational limits of your system define the specifications for the fittings you need.
Pressure Rating: Ensure the fittings can handle the maximum operational pressure of your system. Exceeding the pressure rating can lead to leaks or failure.
Temperature: Fittings must be capable of operating within the temperature range of your application. High temperatures can affect the sealing capability and structural integrity of the fitting.
Compatibility with Tubing Materials
A fitting’s compatibility with the tubing or pipe material is essential for a secure and leak-proof connection.
Tubing Type: Whether you’re using soft tubing, such as PEX or nylon, or hard tubing, like copper or stainless steel, the fitting must be designed to form a secure bond with the material.
Tubing Size: The outer diameter of the tubing must match the fitting size. An improper fit can result in leaks or disconnection under pressure.
Other Considerations
Chemical Compatibility: For systems transporting chemicals, ensure both the fitting material and the sealing elements are compatible with the chemicals in use.
Environmental Conditions: Factors such as UV exposure, moisture, and temperature fluctuations can affect the longevity and performance of the fittings. Choose materials and designs suited to the environment in which they will be used.
How to Install Push Connect Fitting
Installing push to connect fittings is straightforward, but attention to detail is crucial to ensure a secure and leak-free connection. Follow these detailed steps:
Prepare the Tubing
Ensure the tubing end is cut cleanly and squarely. Use a tube cutter for a precise cut. A clean, square cut is vital for a secure fit and seal.
Inspect the tubing end. Check for any damage, irregularities, or debris. The tubing should be smooth and undamaged to avoid leaks.
Measure and Mark Insertion Depth
Mark the insertion depth on the tubing. This ensures that the tubing is fully inserted into the fitting for a secure connection. The insertion depth can typically be found in the fitting’s specifications.
Insert the Tubing into the Fitting
Insert the tube into the fitting until it reaches the stop. Push firmly but gently until the tube hits the internal stop of the fitting. This ensures that the tube is inserted to the correct depth.
Verify the Connection
Pull on the tube to ensure it is secure. A properly installed tube will resist efforts to pull it out of the fitting. This is a critical step to confirm that the connection is secure.
Additional Installation Tips
Ensure compatibility. Before installation, confirm that the tubing material is compatible with the push to connect fitting. Not all fittings work with all types of tubing.
Check for leaks. Once installed, it’s a good practice to test the system under pressure if possible. This can be done using water or air, depending on the system’s intended use.
Use proper tools. While push to connect fittings do not require tools for the connection itself, using a tube cutter instead of scissors or a saw ensures a clean, square cut that is crucial for a proper fit.
Maintenance Best Practices
Regular Inspection
Schedule Regular Checks: Establish a routine schedule to inspect all push to connect fittings for signs of wear, damage, or leakage. The frequency of these checks should be based on the system’s operational demands and environmental conditions.
Look for Signs of Fatigue: Pay special attention to fittings in areas subject to high vibration, extreme temperature fluctuations, or aggressive chemicals, as these conditions can accelerate wear.
Cleanliness
Keep Fittings Clean: Ensure the area around the fittings is free from dust, debris, and chemicals. Cleanliness is particularly important in systems that are sensitive to contamination, such as medical or food processing equipment.
Prevent Debris Entry: During maintenance or system reconfiguration, cover open tubing and fittings to prevent the ingress of debris.
System Pressure and Temperature Monitoring
Monitor System Pressure: Regularly check the system’s pressure to ensure it remains within the operational limits of the fittings. Sudden pressure spikes can indicate potential issues elsewhere in the system that need attention.
Temperature Considerations: If the system operates in varying temperatures, ensure that the fittings are rated for such fluctuations. Temperature changes can affect the sealing efficiency and material integrity of the fittings.
Handling and Storage
Proper Handling: When installing or replacing fittings, handle them with care to avoid damaging the sealing surfaces or the internal components.
Correct Storage: Store unused fittings in a clean, dry environment to prevent premature degradation, especially for fittings made from materials sensitive to moisture or sunlight.
Tubing Care
Inspect Tubing Regularly: Alongside fitting inspection, check the tubing for cracks, abrasions, or any signs of deterioration. Damaged tubing can compromise the fitting’s seal.
Use Appropriate Tubing: Ensure the tubing material and size are compatible with the push to connect fittings, and replace any tubing that no longer meets the system’s requirements.
How to Remove Push to Connect Fitting
The design of push to connect fittings not only simplifies the installation process but also ensures that their removal can be done quickly and efficiently. Following these steps will help you safely remove the fitting without harming the tubing or the fitting itself.
Step-by-Step Removal Fittings
Prepare the Area
Ensure the system is depressurized before attempting to remove the fitting.
Clean the fitting and the surrounding area to prevent debris from entering the system upon disconnection.
Press Down on the Release Ring:
Locate the release ring, which may be less visible or harder to press compared to plastic fittings.
Use a clean, dry cloth to improve grip if necessary. For metal fittings, applying even pressure is crucial to avoid deforming the release mechanism.
Pull the Tube Out of the Fitting:
While pressing down on the release ring, apply a steady pulling force on the tubing.
Metal fittings may require a firmer pull compared to plastic ones due to the tighter seal and stronger grip on the tubing.
Tips for Successful Removal
Inspect the Fitting and Tubing: Before attempting removal, inspect both the fitting and the tubing for any damage or wear that might complicate the process.
Use the Correct Hand Position: Ensure your hands are positioned in a way that allows you to apply even pressure on the release ring while pulling the tubing. This may require adjusting your grip or using both hands.
Avoid Using Tools on the Release Ring: While it might be tempting to use pliers or other tools to press the release ring, doing so can damage the fitting. If the release ring is difficult to press, it may indicate that the fitting is under tension or that debris is obstructing the mechanism.
Additional Tips
Use Proper Tools if Necessary: If the release ring is particularly tight or difficult to press by hand, consider using a tool designed for this purpose. Be cautious to choose a tool that won’t damage the fitting or the tubing.
Check for Special Features: Some metal push to connect fittings may have additional locking mechanisms for extra security in high-pressure applications. Ensure these are fully disengaged before attempting removal.
Inspect for Wear or Damage: After removal, inspect both the fitting and the tubing for any signs of wear or damage. Metal fittings, while durable, can still suffer from fatigue or corrosion depending on the environment.
Lubricate if Reusing: If you plan to reuse the fitting, applying a small amount of appropriate lubricant to the O-ring can ensure a better seal when reinserted. Ensure the lubricant is compatible with the system’s fluids and materials.
Conclusion
Push-to-connect fittings are easy to use and can withstand a wide variety of operational requirements, making them a valuable resource for professionals and DIY enthusiasts. Users can ensure optimal system performance and longevity by simply following the outlined best practices when selecting, installing, maintaining and removing them. As we continue to embrace and integrate these innovative solutions, the potential to simplify operations and enhance system integrity will grow.

