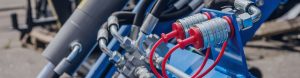
The most significant benefit of correctly installing a hydraulic quick coupler is the prevention of leaks. Leaking hydraulic fluid can lead to environmental hazards, loss of system pressure, and a decrease in overall efficiency. Additionally, leaks often result in expensive repairs and costly downtime. When the coupler is installed properly, it ensures a secure seal, maintaining pressure integrity and ensuring that the hydraulic fluid stays where it needs to be.
Step-by-Step Guide: How to Install Hydraulic Quick Coupler
Installing a hydraulic quick coupler might seem like a straightforward task, but the process requires precision and attention to detail to ensure everything works as it should. Following the right steps helps guarantee a secure, leak-free connection that maximizes the efficiency and safety of your hydraulic system. Below, we’ve broken down the installation process into easy-to-follow steps.
Step 1: Preparing the Hydraulic System for Installation
Before diving into the actual installation, it’s essential to prepare the hydraulic system. First, turn off the power or pressure to the system to avoid accidents. Next, depressurize the hydraulic lines by releasing any built-up pressure, either through valves or a separate release mechanism. This step is crucial to prevent hydraulic fluid from spraying or leaking when you disconnect old couplings or install new ones. Finally, inspect the system for any existing damage or issues that could interfere with the installation process. Make sure all components are in good condition, and if necessary, clean or replace any parts before moving forward.
Step 2: Ensuring Cleanliness – The Importance of Clean Surfaces
One of the most important yet often overlooked aspects of hydraulic system installation is cleanliness. Dirt, debris, or even oil residues on the surfaces of the coupler and connectors can prevent a proper seal, leading to leaks or system malfunctions. Before installation, thoroughly clean the surfaces where the quick coupler will be connected. Use a clean, lint-free cloth or an appropriate cleaning solution to wipe down the components. Additionally, ensure that the hydraulic lines are free from contaminants, as particles can damage seals and O-rings, reducing the lifespan of the coupler.
Step 3: Correctly Aligning the Coupler and Connector
Proper alignment is essential to ensure that the hydraulic quick coupler connects seamlessly. If the coupler and connector are misaligned, it can cause leaks, difficulty in coupling, and excessive wear. When positioning the quick coupler, make sure that the male and female components align perfectly, with no angular distortions. The coupling should slide in smoothly without resistance. Take your time to check alignment before securing it in place to avoid problems that could arise later in the installation process.
Step 4: Tightening the Quick Coupler – Torque Specifications to Follow
Once the coupler is aligned, it’s time to tighten it. However, it’s important to follow the recommended torque specifications for the coupler. Over-tightening can damage the threads or cause excessive pressure on the seals, while under-tightening can lead to leaks. Always refer to the manufacturer’s guidelines for the correct torque value for your specific quick coupler model. You can use a torque wrench to ensure that you apply the correct amount of force. Tighten the coupler in gradual increments rather than all at once to ensure even pressure distribution across the connection.

Step 5: Final Checks and Pressure Testing the Installation
After the coupler is securely tightened, perform a final visual inspection to ensure that everything looks correct. Double-check for any visible gaps, misalignments, or signs of wear on the seals. Once you’re satisfied with the installation, it’s time for pressure testing. Apply pressure to the hydraulic system and observe the coupler and surrounding area for leaks. If you notice any fluid escaping, depressurize the system, correct the issue, and re-test until the installation is leak-free. Pressure testing is a crucial step to ensure the system functions correctly under operating conditions and that no issues remain before use.
Common Mistakes to Avoid During Installation
Even with the best intentions, mistakes during hydraulic quick coupler installation can lead to inefficiencies, costly repairs, and even safety hazards. Being aware of common errors and how to avoid them can help ensure that your installation process goes smoothly, and that your hydraulic system functions optimally. Below are some of the most frequent mistakes made during installation and tips on how to avoid them.
Mistake 1: Using Incorrect Coupler Size or Type
One of the most common and critical mistakes is choosing the wrong size or type of hydraulic quick coupler. Using a coupler that’s too small or too large for the system can lead to poor connections, excessive pressure loss, or even failure. Additionally, different types of couplers (e.g., ISO, BSP, NPT) are designed for specific systems and applications. Always verify the required coupler specifications—such as size, thread type, and pressure rating—before purchasing. Refer to system manuals or consult with experts to ensure compatibility with the hydraulic connectors and hoses in your system.
Mistake 2: Not Ensuring Proper Alignment of Components
Misalignment during installation can lead to significant issues like leaking, excessive wear, and difficulty in coupling. If the coupler and connector aren’t aligned correctly, the connection might not form properly, causing stress on the parts and reducing their effectiveness. This mistake often occurs when trying to rush the installation. Be patient and double-check that both the male and female parts of the coupler are perfectly aligned. Proper alignment ensures a smooth connection and prevents damage to the seals, threads, and coupler components.
Mistake 3: Over-Tightening or Under-Tightening Connections
Finding the right amount of torque when tightening a hydraulic quick coupler is crucial. Over-tightening can strip threads, damage seals, or even cause cracks in the coupler, while under-tightening can lead to leaks and connection failures. Both issues can compromise the integrity of your hydraulic system. Always refer to the manufacturer’s torque specifications to tighten the coupler to the correct level. Using a torque wrench to ensure accuracy is highly recommended, as it helps you apply even and consistent pressure during installation.
Mistake 4: Ignoring Proper Sealing and O-Ring Installation
The sealing components, such as O-rings and gaskets, play a vital role in ensuring leak-free hydraulic connections. Ignoring proper installation of these parts can result in fluid leakage, pressure loss, or even total system failure. Before installation, inspect the O-rings for signs of damage or wear. Make sure they are properly seated and lubricated according to the manufacturer’s guidelines. Failing to do so can lead to poor sealing and operational inefficiency, as even a small leak can cause significant issues in high-pressure systems.
Mistake 5: Failing to Check for Hydraulic Fluid Compatibility
Another mistake to avoid is failing to check the compatibility of the hydraulic fluid with the coupler material. Hydraulic fluids come in various types, and some can be corrosive to certain metals or seal materials, potentially causing leaks or damage over time. Always ensure that the hydraulic fluid you’re using is compatible with both the coupler and any seals, O-rings, or gaskets in the system. This will not only extend the life of your hydraulic components but will also ensure that the system operates at peak efficiency.

Mistake 6: Not Performing Pressure Testing After Installation
After installing the hydraulic quick coupler, many people skip the crucial step of pressure testing. This oversight can result in undetected leaks or weak connections that could compromise the entire system. Pressure testing is the best way to ensure that the coupler is functioning properly under operational conditions. Always conduct a pressure test after installation to check for leaks or other issues. If any leakage or malfunction is detected, take immediate action to correct the problem before returning the system to full service. This step guarantees the installation is sound and that the system will operate as expected without any surprises.
Troubleshooting Hydraulic Quick Coupler Issues
Even with proper installation, hydraulic quick couplers can sometimes experience issues. Identifying and addressing problems quickly is key to maintaining the performance and safety of your hydraulic system. This section will guide you through troubleshooting common issues like connection failures and poor hydraulic flow, helping you resolve them efficiently.
How to Fix Hydraulic Connection Failures
Hydraulic connection failures can manifest in various ways, including leaks, inability to fully connect, or failure to disconnect properly. Here’s how to troubleshoot and fix these issues:
Check for Misalignment: Often, connection failures are caused by misalignment between the coupler and connector. If the male and female components are not properly aligned, the coupler may not engage or seal properly. Inspect the connection to ensure everything is aligned and that the parts fit snugly together.
Examine for Debris or Contamination: Dirt, rust, or other contaminants can prevent a proper seal or cause damage to the internal parts of the coupler. Clean the connection points thoroughly before reassembling, making sure all components are free from debris. Use lint-free cloths or cleaning tools designed for hydraulic systems to prevent damage.
Inspect Seals and O-Rings: If you notice leaks or difficulty in securing the coupler, check the seals and O-rings. Over time, seals can wear out or become damaged. If you find any visible damage, replace the seals or O-rings with new, compatible parts. Always lubricate O-rings according to the manufacturer’s instructions before installation to ensure proper sealing.
Ensure Correct Coupler Size: If the coupler doesn’t fit properly or fails to engage, it might not be the correct size for your hydraulic system. Verify that the coupler is compatible with the hose or connector in terms of size, thread type, and pressure rating. A mismatched coupler is a common cause of connection failure.
Check for Worn or Damaged Threads: Over-tightening or improper handling during installation can damage the threads on the coupler or connector. Damaged threads can result in leaks or difficulty connecting. If the threads are worn, you may need to replace the affected components.
Troubleshooting Poor Hydraulic Flow After Installation
If you’re experiencing poor hydraulic flow after installing a quick coupler, it’s essential to identify the root cause quickly to prevent system inefficiency or failure. Here are some steps to troubleshoot poor flow:
Verify Proper Coupler Size and Compatibility: If the coupler is too small or incorrectly matched to the system, it can restrict fluid flow. Ensure that the coupler’s flow capacity matches the needs of your hydraulic system. Also, confirm that all couplers, hoses, and fittings are compatible with the fluid flow requirements.
Check for Internal Blockages: A blockage inside the coupler or hoses can restrict the flow of hydraulic fluid. Inspect the hoses, couplers, and connectors for any internal obstructions or buildup, such as dirt, corrosion, or debris. If blockages are found, clean the components thoroughly or replace them if necessary.
Examine for Valve Malfunctions: Some hydraulic quick couplers have built-in valves that help control the flow of hydraulic fluid. If these valves become stuck, damaged, or malfunctioning, they can cause poor flow. Check the valve components for signs of wear or damage, and replace any faulty valves.
Inspect for Leaks in the System: Leaks can reduce the overall pressure and flow in a hydraulic system. Even small leaks in the coupler or hose can result in a noticeable decrease in hydraulic flow. Check all connections, seals, and hoses for leaks, and replace any damaged parts as needed.
Test for Proper Pressure Settings: Low pressure can also lead to poor flow. After installation, check the system’s pressure settings to ensure they are within the recommended range. If the pressure is too low, you may need to adjust the pressure relief valve or check for any issues that could be preventing the system from building adequate pressure.
Ensure Proper Coupler Operation: Finally, ensure that the coupler is functioning properly. Some quick couplers, especially those with automatic shutoff or check valves, may not operate correctly if the internal mechanism is damaged. If the coupler is defective, consider replacing it with a new one to restore proper flow.
Advanced Tips for Installing Hydraulic Quick Disconnects
Installing hydraulic quick disconnects in certain environments or conditions can present unique challenges. From tight spaces to high-pressure systems, mastering these advanced techniques will help ensure your installation is efficient, safe, and durable. Below are some tips for handling these more complex scenarios.
Tips for Working in Tight Spaces
Installing hydraulic quick disconnects in tight or confined spaces requires extra care and the right tools. Here’s how to tackle the challenge:
Use Compact, Low-Profile Couplers: For installations in narrow or cramped areas, select compact quick disconnect couplers designed for such environments. These are often shorter and have a lower profile, allowing for easier access and installation.
Invest in Flexible Hoses: In tight spaces, rigid pipes and hoses can be difficult to maneuver. Flexible hydraulic hoses can make the job easier by allowing for more freedom in positioning. Choose hoses that are durable yet flexible enough to fit into confined spaces without straining.
Utilize Specialized Tools: When working in tight spots, traditional tools may not fit. Consider using specialized tools, such as small wrenches, torque adapters, or hydraulic quick disconnect tools designed for tight spaces. These tools help ensure you can tighten or loosen couplings without damaging surrounding components.
Plan the Layout in Advance: Before starting installation, take time to plan the layout of the system. Think about the orientation of the quick disconnect couplers and how to position hoses and components in a way that allows for efficient connection and disconnection, even in tight spaces.
Use a Mirror or Camera for Visibility: In some cases, the workspace may be too tight to view directly. Consider using a mirror or a small inspection camera to get a clear view of the coupler and connector during installation. This can help you ensure correct alignment and avoid misconnections.
How to Install Quick Disconnect Couplers Safely and Efficiently
Quick disconnect couplers are designed for easy connection and disconnection, but installing them correctly and safely is still crucial. Here’s how to do it efficiently:
Wear Proper PPE (Personal Protective Equipment): Always wear safety gloves, goggles, and any other required protective gear. Hydraulic systems are under high pressure, and an accident could cause serious injury. Proper PPE helps reduce risks during installation.
Depressurize the System Before Installation: Before starting the installation or disconnection process, make sure the hydraulic system is fully depressurized. This step is critical to prevent the accidental release of pressurized fluid, which could result in injury or system damage.
Check for Leaks Before Full Operation: After installing the quick disconnect coupler, perform a visual inspection and pressure test to check for leaks. Even a small leak can cause long-term damage to the hydraulic system. If leaks are found, address them immediately before resuming normal operation.
Ensure Easy Access for Future Maintenance: When installing quick disconnect couplers, ensure they are positioned in a way that allows for easy access during future maintenance or repairs. This may require slightly adjusting the placement of components to make the couplers more accessible.
Using Quick Disconnects in High-Pressure Systems
Quick disconnect couplers are commonly used in high-pressure hydraulic systems, but there are specific considerations to keep in mind:
Choose High-Pressure Rated Couplers: Always ensure that the quick disconnect coupler you select is rated for the pressure of your hydraulic system. Using a coupler with an inadequate pressure rating can result in dangerous failures, including bursts or leaks.
Consider the Flow Rating: In addition to pressure, the flow capacity of the coupler is essential in high-pressure systems. Ensure that the coupler is capable of handling the flow requirements of the system without causing excessive pressure drop, which could affect system performance.
Check for Burst Pressure Ratings: In high-pressure systems, it’s crucial to select quick disconnects that have burst pressure ratings well above the operating pressure of your system. This ensures that even in the event of a system pressure surge, the coupler will not fail.
Use Couplers with Secure Locking Mechanisms: For high-pressure applications, it’s essential to use quick disconnect couplers with reliable locking mechanisms that prevent accidental disconnections under pressure. A good locking mechanism ensures that the coupler remains securely attached even during high-pressure operations.
Inspect Regularly for Wear: In high-pressure systems, components experience more stress and wear. Regularly inspect quick disconnect couplers for signs of fatigue, wear on the seals, or other damage that could lead to leaks or connection failure. Replace any worn or damaged parts immediately to avoid system failure.
Perform Leak Testing After Installation: After installing quick disconnects in high-pressure systems, always conduct a thorough leak test. Under high pressure, even small leaks can become catastrophic, so testing for leaks before full system operation is vital to ensuring system integrity.
Conclusion
Mastering installation and maintenance will help you avoid costly mistakes, keep your hydraulic system running smoothly, and ensure its continued performance and safety.
FAQ
What is a hydraulic quick coupling?
Hydraulic quick couplings are quick connecting and disconnecting devices used in hydraulic systems to quickly connect and disconnect hydraulic lines without leaking hydraulic fluid.
How to install hydraulic quick couplings?
When installing hydraulic quick couplings, you first need to clean the system and make sure the connectors are aligned. Then, tighten the fitting according to the manufacturer’s torque specifications and perform a final inspection and pressure test to ensure there are no oil leaks.
What do I need to be aware of when installing hydraulic quick couplings?
When installing, avoid using the wrong fitting size, make sure it is correctly mated, avoid over-tightening or over-loosening the connection, and check that the O-rings and seals are in place.
What should I do if hydraulic quick coupling leaks oil?
If the hydraulic quick coupling leaks oil, first check whether the connection is correctly docked and whether the O-ring is damaged or aging. If there is damage, replace the seals or joints in time.
How long is the service life of hydraulic quick coupling?
The service life of hydraulic quick couplings depends on the working environment, pressure and maintenance. Regular inspection and maintenance can greatly extend its service life.
How to avoid common mistakes during the installation of hydraulic quick couplings?
To avoid common mistakes, be sure to use the correct type and size of fitting, ensure proper alignment, tighten the fitting to the specified torque standard, and perform a thorough inspection after installation.