Hose clamps are essential components used to secure hoses onto fittings or pipes, ensuring a leak-proof connection in various systems, from automotive to industrial applications. Proper tightening and removal of hose clamps are crucial to maintain system integrity, prevent leaks, and avoid damage to the hoses. This post aims to provide a comprehensive guide on the different types of hose clamps, how to correctly tighten and remove them, and best practices to ensure reliable performance and longevity.
Types of Hose Clamps
A. Worm Gear Clamps
Description: Worm gear clamps consist of a metal band with a screw mechanism that tightens the band around the hose. They are often made of stainless steel for corrosion resistance.
Common Uses: Used in automotive, plumbing, and industrial applications where adjustable and secure fastening is needed.
Advantages:
Adjustable size for a range of hose diameters.
Provides a strong and secure hold.
Widely available and relatively inexpensive.
Disadvantages:
Can damage the hose if over-tightened.
May be susceptible to corrosion if not made from stainless steel.
Requires a screwdriver for adjustment.
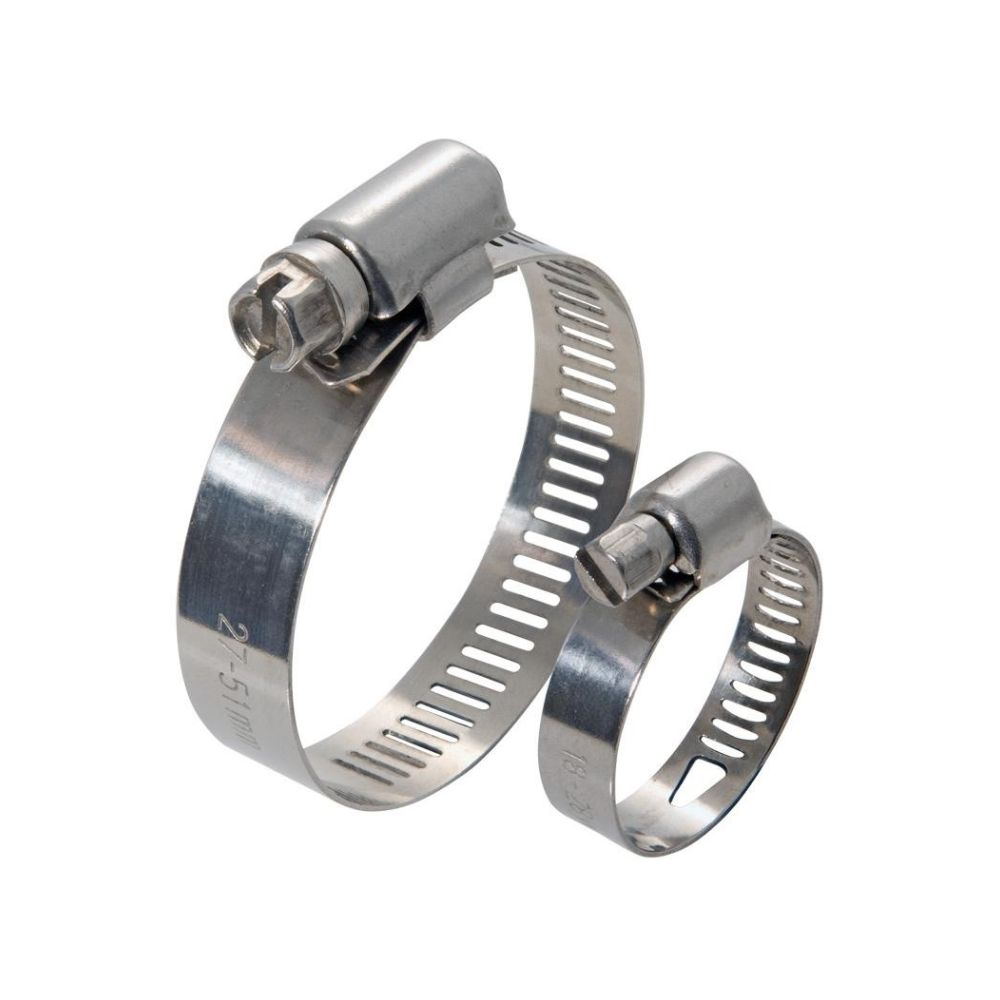
B. Spring Clamps
Description: Spring clamps use a spring mechanism to exert constant pressure on the hose. They are usually made from stainless steel or spring steel.
Common Uses: Common in automotive and household applications where consistent pressure is required without frequent adjustments.
Advantages:
No tools are needed for adjustment.
Maintains consistent pressure on the hose.
Durable and resistant to corrosion.
Disadvantages:
Limited to specific hose sizes.
Can be difficult to install or remove in tight spaces.
Less flexible in terms of size adjustments compared to worm gear clamps.
C. T-Bolt Clamps
Description: T-bolt clamps have a band with a T-bolt mechanism that provides high clamping force. They are usually made from stainless steel and are designed for heavy-duty applications.
Common Uses: Used in high-pressure applications, including in automotive and industrial systems where a strong, leak-proof seal is required.
Advantages:
Provides a strong and secure hold, suitable for high-pressure applications.
Adjustable and can accommodate a range of hose sizes.
Resistant to vibration and movement.
Disadvantages:
Generally more expensive than other types of clamps.
Requires a wrench or socket for adjustment.
Larger and heavier, which may not be suitable for all applications.
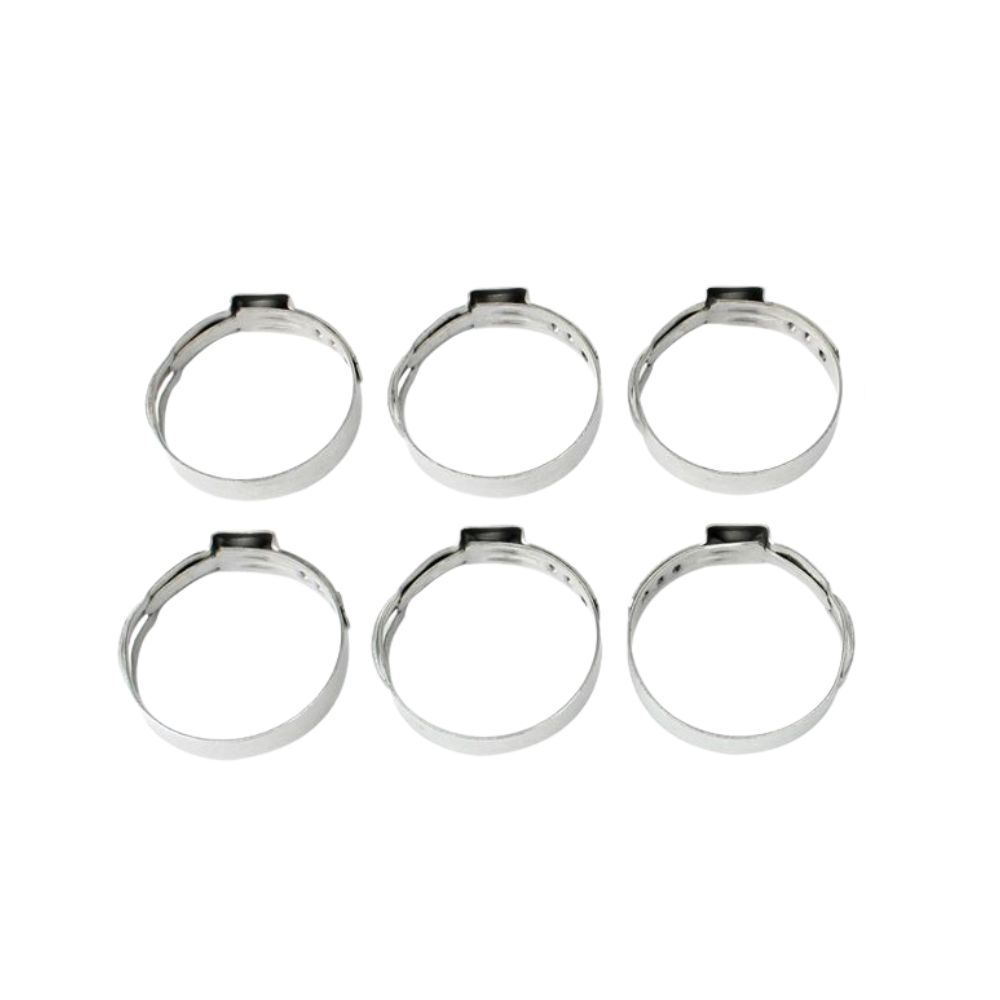
D. Ear Clamps
Description: Ear clamps are a type of clamp where the band is formed into an “ear” shape that is crimped onto the hose. They are typically used for their simplicity and effectiveness.
Common Uses: Often used in automotive and industrial applications where a tight, permanent seal is needed.
Advantages:
Provides a tight, permanent seal that is resistant to leakage.
Simple in design and easy to use with crimping tools.
Affordable and reliable for specific applications.
Disadvantages:
Not adjustable once installed, so exact sizing is critical.
Requires specialized tools for installation and removal.
Can be challenging to install or remove in confined spaces.
E. Band Clamps
Description: Band clamps are similar to worm gear clamps but often feature a wider band for distributing pressure more evenly. They are used in a variety of applications and can be made from different materials including stainless steel.
Common Uses: Used in both automotive and industrial settings, particularly where a more even distribution of pressure is required.
Advantages:
Provides an even clamping force, reducing the risk of hose damage.
Adjustable and suitable for various hose sizes.
Durable and resistant to high pressures.
Disadvantages:
Can be more expensive than standard worm gear clamps.
Requires a tool for adjustment.
Bulkier than some other types of clamps, which may limit use in tight spaces.
How to Tighten Hose Clamps
A. Worm Gear Clamps
Step-by-Step Instructions:
Position the Clamp: Slide the clamp over the hose and align it with the fitting.
Adjust the Size: Use a screwdriver to turn the screw on the clamp, adjusting the size to fit the hose snugly.
Tighten the Clamp: Turn the screw clockwise to tighten the clamp around the hose and fitting.
Check for Tightness: Ensure the clamp is tight but not over-tightened, which can damage the hose.
Tips for Proper Tightening:
Use a screwdriver with a good grip to avoid slipping.
Check the clamp periodically to ensure it maintains the correct tightness.
Avoid over-tightening to prevent crushing or deforming the hose.
B. Spring Clamps
Step-by-Step Instructions:
Position the Clamp: Place the spring clamp around the hose and fitting.
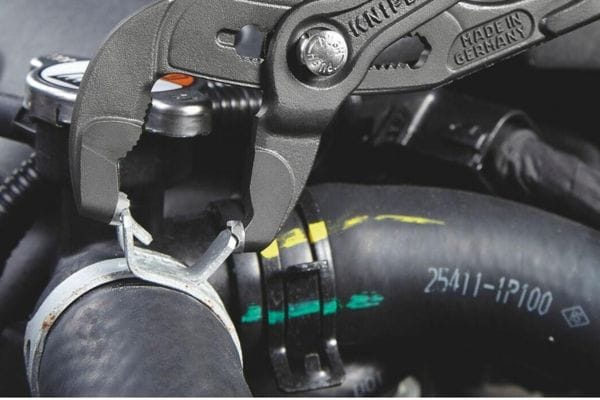
Compress the Spring: Use pliers to compress the spring and slide the clamp into position.
Release the Clamp: Let go of the pliers to allow the spring clamp to expand and secure the hose.
Verify the Fit: Check that the clamp is securely in place and providing even pressure.
Tips for Proper Tightening:
Use pliers with a firm grip to control the spring clamp.
Ensure the clamp is positioned evenly around the hose to prevent leaks.
Avoid using excessive force when compressing the spring to prevent damage.
C. T-Bolt Clamps
Step-by-Step Instructions:
Position the Clamp: Place the T-bolt clamp around the hose and fitting.
Align the Bolt: Ensure the T-bolt is aligned with the clamp’s slots.
Tighten the Bolt: Use a wrench or socket to turn the T-bolt clockwise, tightening the clamp around the hose.
Check for Tightness: Confirm that the clamp is securely tightened without any movement.
Tips for Proper Tightening:
Use a torque wrench to ensure even tightening and prevent over-tightening.
Make sure the clamp is properly aligned to avoid uneven pressure.
Regularly inspect the clamp for any signs of wear or loosening.
D. Ear Clamps
Step-by-Step Instructions:
Position the Clamp: Slide the ear clamp over the hose and fitting.
Crimp the Clamp: Use a crimping tool to compress the “ear” of the clamp onto the hose.
Check the Fit: Ensure the clamp is tightly crimped and secure around the hose.
Tips for Proper Tightening:
Use a crimping tool specifically designed for ear clamps to ensure a secure fit.
Verify that the clamp is evenly crimped to prevent leaks.
Ensure the hose and fitting are properly aligned before crimping.
E. Band Clamps
Step-by-Step Instructions:
Position the Clamp: Place the band clamp around the hose and fitting.
Adjust the Clamp: Use a screwdriver or wrench to adjust the clamp’s size to fit the hose.
Tighten the Clamp: Turn the adjustment screw or bolt to tighten the band clamp around the hose.
Verify the Tightness: Check that the band is snug and secure without over-tightening.
Tips for Proper Tightening:
Use a tool that provides good leverage to ensure the band is tightened evenly.
Avoid over-tightening, which can damage the hose or the fitting.
Regularly inspect the clamp to ensure it remains secure and effective.
How to Remove Hose Clamps
A. Worm Gear Clamps
Step-by-Step Instructions:
Locate the Screw: Identify the screw on the worm gear clamp.
Loosen the Clamp: Use a screwdriver to turn the screw counterclockwise to loosen the clamp.
Slide the Clamp Off: Once loosened, slide the clamp off the hose.
Remove the Hose: Carefully pull the hose off the fitting if needed.
Common Issues and Solutions:
Clamp Stuck: If the clamp is stuck, try applying penetrating oil to the screw threads to loosen it.
Stripped Screw: If the screw is stripped, use a screw extractor tool to remove it, or replace the clamp if necessary.
Hose Damage: If the hose is damaged during removal, replace it with a new one to prevent leaks.
B. Spring Clamps
Step-by-Step Instructions:
Compress the Clamp: Use pliers to compress the spring mechanism.
Slide the Clamp Off: While holding the clamp compressed, slide it off the hose.
Release the Pliers: Once the clamp is removed, release the pliers.
Remove the Hose: Pull the hose off the fitting if needed.
Common Issues and Solutions:
Clamp Too Tight: If the clamp is too tight, carefully use a larger pair of pliers or a spring clamp removal tool.
Spring Mechanism Malfunction: If the spring mechanism is malfunctioning, consider using a replacement clamp.
Hose Damage: If the hose is damaged, replace it and ensure proper fitment of the new clamp.
C. T-Bolt Clamps
Step-by-Step Instructions:
Loosen the Bolt: Use a wrench or socket to turn the T-bolt counterclockwise to loosen it.
Slide the Clamp Off: Once the bolt is sufficiently loosened, slide the clamp off the hose.
Remove the Hose: Carefully pull the hose off the fitting if needed.
Common Issues and Solutions:
Bolt Stuck: If the bolt is stuck, apply penetrating oil to ease loosening, or use a breaker bar for additional leverage.
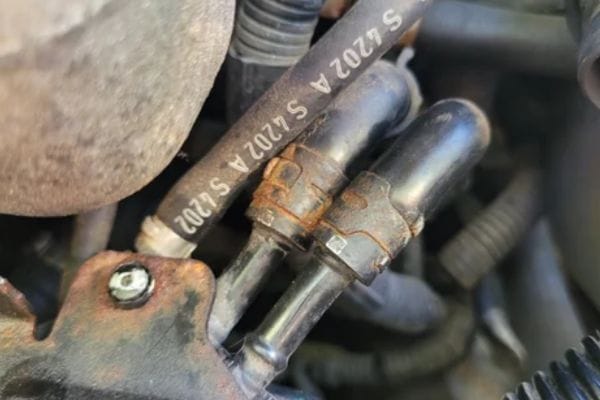
Rust or Corrosion: For rusted or corroded clamps, use a rust remover or replace the clamp with a new one.
Hose Damage: Inspect and replace the hose if it is damaged during removal.
D. Ear Clamps
Step-by-Step Instructions:
Locate the Crimped Ear: Identify the crimped “ear” of the clamp.
Use Crimping Tool: If possible, use a crimping tool to carefully cut or remove the crimped ear.
Slide the Clamp Off: Remove the clamp from the hose once it is no longer crimped.
Remove the Hose: Pull the hose off the fitting if needed.
Common Issues and Solutions:
Clamp Resistant: For stubborn ear clamps, use a cutting tool or specialized ear clamp removal tool.
Crimping Tool Issues: Ensure you use a high-quality crimping tool for efficient removal.
Hose Damage: If the hose is damaged, replace it with a new one and ensure proper installation of a new clamp.
E. Band Clamps
Step-by-Step Instructions:
Locate the Adjustment Mechanism: Find the screw or bolt used for tightening the band clamp.
Loosen the Clamp: Use a screwdriver or wrench to turn the screw or bolt counterclockwise to loosen the band clamp.
Slide the Clamp Off: Once loosened, slide the band clamp off the hose.
Remove the Hose: Carefully pull the hose off the fitting if needed.
Common Issues and Solutions:
Clamp Stuck: Apply penetrating oil to the screw or bolt threads if the clamp is stuck.
Damaged Band: If the band is damaged, consider replacing it with a new one.
Hose Damage: Inspect the hose for damage and replace it if necessary to ensure a proper seal.
Common Issues and Troubleshooting
A. Leaks
Causes:
Improper Tightening: The clamp may not be tightened enough, leading to leaks.
Hose Damage: The hose may be cracked or damaged, compromising the seal.
Misalignment: The hose or clamp might be improperly aligned with the fitting.
Solutions:
Re-tighten the Clamp: Adjust the clamp to ensure it is tightened properly. Follow the manufacturer’s recommended torque settings.
Inspect and Replace the Hose: Check for any visible damage or cracks in the hose. Replace it if necessary.
Realign Components: Ensure that the hose and fitting are properly aligned before securing the clamp.
B. Slippage
Causes:
Inadequate Clamp Pressure: The clamp may not provide sufficient pressure to hold the hose in place.
Incorrect Clamp Size: Using a clamp that is too large or too small can lead to slippage.
Vibration or Movement: Excessive vibration or movement can cause the clamp to loosen.
Solutions:
Adjust the Clamp Pressure: Increase the tightness of the clamp to ensure it exerts enough pressure on the hose.
Use the Correct Clamp Size: Ensure that the clamp is the appropriate size for the hose and fitting.
Secure the Assembly: Use additional supports or anti-vibration mounts if excessive movement is a problem.
C. Clamp Damage
Causes:
Over-tightening: Excessive tightening can deform or break the clamp.
Corrosion: Exposure to harsh environments can lead to rust or corrosion of the clamp.
Improper Installation: Incorrect installation techniques can cause physical damage to the clamp.
Solutions:
Avoid over-tightening: Follow proper tightening procedures to avoid damaging the clamp. Use a torque wrench if necessary.
Replace Corroded Clamps: Inspect for signs of corrosion and replace damaged clamps with new ones made from corrosion-resistant materials.
Ensure Proper Installation: Use the correct tools and techniques for installation to prevent damage.
Conclusion
Each type of clamp has unique features and is suited to different needs, whether it’s the ease of adjustment with a worm gear clamp or the high-pressure capabilities of a T-bolt clamp. Knowing how to correctly remove clamps is vital to prevent harm to the hose or fitting, ensuring that replacements or repairs can be carried out smoothly.
FAQ
What is the purpose of a hose clamp?
Hose clamps secure hoses to fittings or pipes, preventing leaks and ensuring a tight seal.
How do I choose the right hose clamp?
Select a clamp based on the hose size, type of application, and environmental conditions. Common types include worm gear, spring, and T-bolt clamps.
How tight should I make a hose clamp?
Tighten the clamp enough to create a secure seal without over-tightening. Follow the manufacturer’s specifications or use a torque wrench for precise tightening.
Can I reuse hose clamps?
Hose clamps can often be reused if they are in good condition. Inspect them for damage or wear before reusing them.
How do I remove a hose clamp?
Use the appropriate tool for the clamp type (e.g., screwdriver for worm gear, pliers for spring clamps) and follow the removal steps to avoid damaging the hose or fitting.
What should I do if a hose clamp starts to leak?
Check if the clamp is properly tightened and if the hose is damaged. If necessary, replace the clamp or hose to stop the leak.


